

Building a DID Starter Dapp with Spruce and NextJs

Hi I'm Phenzic I simply wanna help you transition into web3 seamlessly...
What is decentralized Identity?
Digital identities are like little puzzle pieces on the internet. A stream of endless and pure quiescent data, being monetized and manipulated actively by anyone who sees fit and understands how it works.
But what if we could grab hold of those pieces, own them, and decide who gets to see them? Having total ownership of your own data stream on the internet, that's where decentralized identity swoops in like a caped hero. it's all about giving you the reins to your own digital story. Imagine having a say in how, where, and with whom you share your online self – that's the promise of decentralized identity.
On completing this tutorial you'll learn how to build a starter Dapp with Sprice SSX and Next.js. Which helps you get started with building more complex Dapps and implementing DID features
Prerequisites
Metamask: Which will serve as your Identification key
Node package manager (npm): to run the required packages for the application.
Understanding Decentralized Identity and How SpruceID Works
SpruceID is a decentralized identity solution built and designed to keep users in control of their digital identities. SpruceID is a platform that utilizes decentralized technologies, including the blockchain, to improve the way individuals manage and authenticate their online data. Instead of relying on traditional centralized entities to validate and store personal information, SpruceID enables users to validate and store personal information, as well as create and manage their decentralized identifiers (DIDs). These DIDs act as unique representations of an individual's identity, allowing them to selectively share their information in different online interactions.
The architecture of SpruceID is rooted in the principles of user-centricity and privacy. When users interact with online services that integrate SpruceID, they have the autonomy to decide what information is shared and with whom. The decentralized nature of SpruceID ensures that personal data isn't stored in a single, vulnerable location but is rather distributed across a secure network. By leveraging cryptographic principles, SpruceID enables users to cryptographically sign and verify their interactions, adding an extra layer of security and trust to the decentralized identity ecosystem.
In practical terms, SpruceID operates through a combination of decentralized identifiers, verifiable credentials, and secure authentication methods. Users create their DIDs, which serve as the foundation for their decentralized identity. Verifiable credentials, such as educational degrees or professional certifications, can be issued by trusted entities and associated with the user's DID. Authentication relies on cryptographic keys, ensuring that only the rightful owner of the decentralized identity can assert or share information.
SpruceID represents a step towards a more user-centric, secure, and privacy-enhancing paradigm for managing digital identities in the dynamic landscape of the internet.
SpruceSSX
SSX is an open-source toolkit by SpruceID that lets developers easily integrate decentralized identity and data into their applications. Decentralized identity lets users control how their data is shared digitally in a secure way that doesn't depend on intermediaries.
Starter Decentralized Identity Dapp with SpruceSSX
Setting Up the Starter Application
Alright, time to get your hands dirty with coding your decentralized identity dapp by setting up the starter application.
Installing and Configuring Necessary Tools: The first step involves getting the right tools in our developer toolkit. Start by installing essential software and dependencies. Ensure you have a solid code editor, such as Visual Studio Code, installed. Additionally, set up a version control system like Git. Don't forget to install Node.js and npm to manage our project's dependencies seamlessly.
Creating the Basic Structure of the Decentralized Identity Application: Now, it's time to lay the foundation for our decentralized identity application. Create a new directory for your project, and within it, establish the basic file structure. You'll want folders for assets, components, and pages. Think of this as sketching the blueprint of your digital identity castle. Remember, clarity in the organization makes the coding adventure smoother.
Setting Up SpruceID SDK and Obtaining Required Credentials: The star of our show is SpruceID, so let's invite it to the party. Begin by setting up the SpruceID SDK in your project. This SDK is the bridge that connects your application to the decentralized identity magic. Head over to SpruceID's developer portal to create an account, obtain your API keys, and access the credentials needed to integrate SpruceID into your application. Think of these credentials as the keys to your digital identity kingdom – keep them safe!
Now that we've set the stage and welcomed SpruceID into our project, the real fun of building a decentralized identity application is about to begin. Buckle up for the next steps where we bring our app to life!
Building the Dapp
To get started with building your next dapp, open a workspace environment in your prefers codespace, and run
npm install @spruceid/ssx.Run the code
npx create-next-app@13to create a new application, you can choose your preferred app namedid_dappand accept all options asyes.After a couple of seconds id installation, you'll have a next starter app created in your working directory.
Change the directory into the new app folder
cd did_dappand run the commandnpm run devto start the demo app.Open up a new terminal to run the command
npm i @spruceid/ssx-serverto install the SSX backend server.Next, you'll need to a couple of folders to add different pages, to do this run the command.
    mkdir app/api \
       app/api/ssx-nonce \
       app/api/ssx-login \
       app/api/ssx-logout
 touch .env.local \
       app/api/_ssx.ts \
       app/api/ssx-nonce/route.ts \
       app/api/ssx-login/route.ts \
       app/api/ssx-logout/route.ts
Open the
did_dapp/.env.localfile and add the variable `SSX_SIGNING_KEY=anythingyouwanthere` for handling your application session, the value could be anything.Head over to the file
did_dapp/app/api/_ssx.tsand add the code below, to add an object that initializes the server every time you start the application.import { SSXServer } from "@spruceid/ssx-server"; const ssx = new SSXServer({ signingKey: process.env.SSX_SIGNING_KEY, }); export default ssx;Next, head over to the file
did_dapp/app/api/ssx-nonce/route.tsand add the code below. The codeimport ssx from "../_ssx"; export async function GET(request: Request) { const nonce = ssx.generateNonce(); return new Response(nonce, { status: 200, headers: { 'Set-Cookie': `nonce=${nonce}` } }); }Now, head over to the
ssx-loginpage atmy-app/app/api/ssx-login/route.tsand add the code below, to add a signing route, checking the SIWE message, ensuring it's valid.import ssx from "../_ssx"; import { NextResponse } from 'next/server'; import { cookies } from 'next/headers' export async function POST(request: Request) { const body = await request.json(); const cookieStore = cookies(); const nonce = cookieStore.get('nonce'); return NextResponse.json( await ssx.login( body.siwe, body.signature, body.daoLogin, body.resolveEns, nonce?.value ?? "", body.resolveLens, ), { status: 200 } ); }Lastly, to add the signout API route in the file
did_dapp/app/api/ssx-logout/route.ts, copy and paste the code belowimport { NextResponse } from "next/server"; import ssx from "../_ssx"; export async function POST(request: Request) { return NextResponse.json( { success: await ssx.logout() ?? true }, { status: 200 } ); }Now, run the command
npm i @spruceid/ssxto install the SSX library on the front end you must install. You also need to create a component to create the authorization module logic.Run the code
mkdir componentstouch components/SSXComponent.tsxin your root directory.Next update the code in the main CSS file `
did_dapp/app/globals.cssto the code below.button { background: hsl(0, 0%, 60%); border-radius: 12px; border: none; padding: 0; cursor: pointer; outline-offset: 4px; } button span { display: block; padding: 4px 8px; border-radius: 12px; font-size: 0.9rem; background: hsl(153, 33%, 95%); color: black; transform: translateY(-4px); will-change: transform; transition: transform 250ms; } button:hover span { transform: translateY(-8px); } button:active span { transform: translateY(-2px); } button:disabled span { transform: translateY(-2px); opacity: .7; } table { border-collapse: separate; border-spacing: 0 1em; } h1,h2 { margin: 0px; } h2 span { font-size: 12px; } body { padding: 10px; } @media (prefers-color-scheme: dark) { html { color-scheme: dark; } }Next, you need to update the NextConfig to make it compatible with SSX by adding the command in the
my-app/next.config.jsfile./** @type {import('next').NextConfig} */ const nextConfig = { webpack: (config) => { config.externals.push({ 'utf-8-validate': 'commonjs utf-8-validate', 'bufferutil': 'commonjs bufferutil', }) return config }, } module.exports = nextConfigTo create a signing and signout logic, add the code below to the file
my-app/components/SSXComponent.tsx
"use client";
import { SSX } from "@spruceid/ssx";
import { useState } from "react";

const SSXComponent = () => {

  const [ssxProvider, setSSX] = useState<SSX | null>(null);

  const ssxHandler = async () => {
    const ssx = new SSX({
      providers: {
        server: {
          host: "http://localhost:3000/api"
        }
      },
    });
    await ssx.signIn();
    setSSX(ssx);
  };

  const ssxLogoutHandler = async () => {
    ssxProvider?.signOut();
    setSSX(null);
  };

  const address = ssxProvider?.address() || '';

  return (
    <>
      <h2>User Authorization Module</h2>
      <p>Authenticate and Authorize using your ETH keys</p>
      <br></br>
      {
        ssxProvider ?
          <>
            {
              address &&
              <p>
                <b>Ethereum Address:</b> <code>{address}</code>
              </p>
            }
            <br />
            <button onClick={ssxLogoutHandler}>
              <span>
                Sign-Out
              </span>
            </button>
          </> :
          <button onClick={ssxHandler}>
            <span>
              Sign-In with Ethereum
            </span>
          </button>
      }
    </>
  );
};

export default SSXComponent;
- Lastly, replace the code in the file
did_dapp/app/page.tsxwith the one below, and run the commandnpm run dev
import SSXComponent from '@/components/SSXComponent';

export default function Home() {
  return (
    <SSXComponent />
  )
}
Head over to your browser and go to the location of your local host 3000, you should have the application running like in the image below.
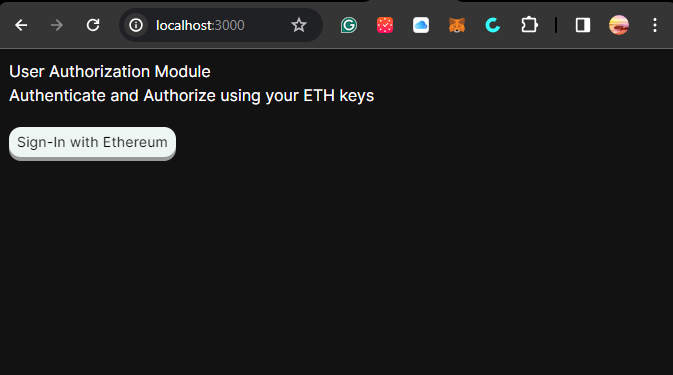
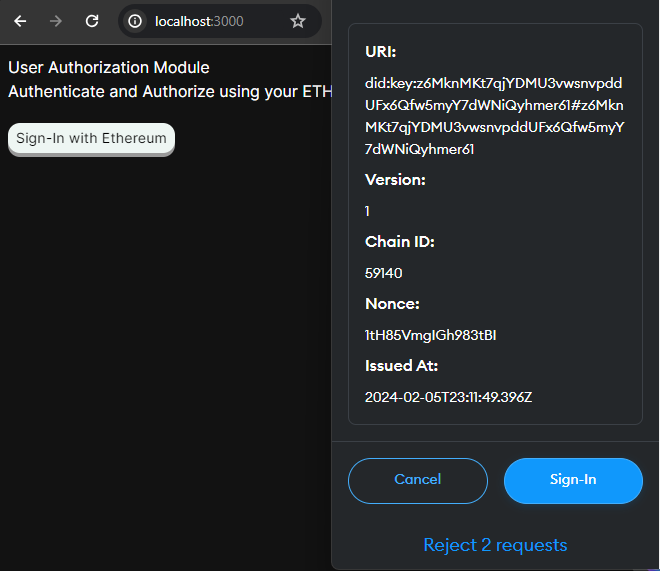
- Click on the button Sign-In with Ethereum to sign in and verify your identity.
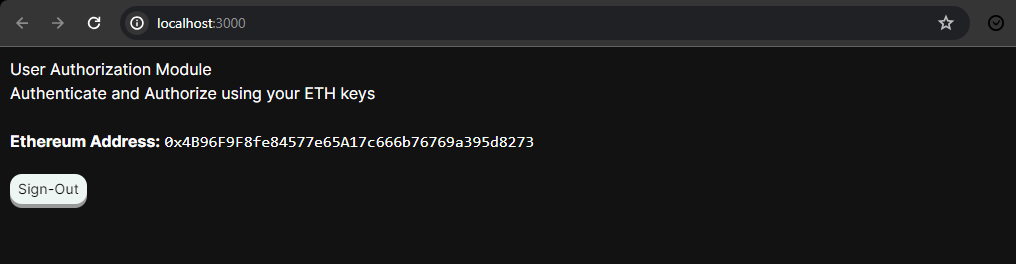
- And when you're signed in, you get more details about the signed-in identity.
Other Decentralized Identity Tools
Polygon ID: A decentralized identity solution built on the Polygon blockchain. It leverages the security and scalability features of Polygon to provide users with a self-sovereign identity.
Microsoft Identity Platform: Microsoft Identity Platform provides a set of tools and services for building secure and user-friendly identity solutions. It supports OAuth 2.0 and OpenID Connect for authentication and authorization
Sovrin: A global decentralized identity network that uses blockchain technology to enable self-sovereign identity. It provides a framework for creating DIDs and managing verifiable credentials.
Litt Protocol: A key management network for decentralized signing and encryption. Creating apps and wallets that use secrets without single points of failure, and providing developers with encryption and programmable signing.
Disco: Disco provides pseudonymous identification for users and allows them to take credentials anywhere. Disco is chain agnostic and uses decentralized identifiers and verified credentials to help users take back their data ownership.
Hyperledger: Hyperledger Indy Is another project under the Hyperledger umbrella that focuses on providing tools and libraries for building decentralized identity systems. It includes implementations of DIDs and verifiable credentials.
Blockstack: Blockstack is a decentralized computing platform that includes identity management as one of its core features. It enables users to have full control over their data and identity.
uPort: uPort is a decentralized identity platform that enables users to create, manage, and control their identities on the Ethereum blockchain. It emphasizes user-centric identity and secure digital credentials.
Benefits of Utilizing Decentralized Identity.
Enhanced Privacy and Control: Decentralized identity gives individuals total control over their data, allowing them to manage and share their information selectively while minimizing the risk of unauthorized access.
Reduced Identity Theft and Fraud: By implementing cryptographic security and decentralized storage, decentralized identity solutions can reduce the likelihood of identity theft and fraudulent activities, enhancing the overall security of digital interactions.
Interoperability and Seamless User Experience: DID promotes interoperability between different systems and platforms, enabling seamless user experiences across various applications while maintaining data integrity and security.
User-Centric Identity Management: DID puts users at the center of the identity management process, allowing them to own, control, and manage their digital identities, leading to a more personalized and user-friendly experience.
Managing Security and Resilience: The DID system systems utilize robust security measures such as encryption, digital signatures, and distributed ledgers to enhance security and resilience against cyber threats and data breaches
Compliance with Regulations: The solutions help organizations comply with data protection and privacy regulations by providing mechanisms for transparent data management, user consent, and adherence to regulatory requirements
Conclusion
This tutorial walks you through getting started with integrating Spurce ID into your Decentralized application.
You can explore better ways to advance and improve the application by going through the SpruceSSX documentation here.
Decentralized identity represents an important shift in the landscape of digital interactions, offering many advantages for individuals, businesses, and the broader digital ecosystem. The journey towards decentralized identity is not merely a technological evolution but a paradigmatic transformation that places control and privacy firmly in the hands of users.
You can also read more about building with spruce here.
You can also find the completed DID Dapp here, feel free to clone and make modifications as you see fit.
If you find this article helpful,
I'd love to connect with you on Twitter | LinkedIn | GitHub | Portfolio


