

How to Create and Call On-Chain Contracts with HardHat on the Scroll Network
Learn how to make live calls from one smart contract to another on the blockchain

Hi I'm Phenzic I simply wanna help you transition into web3 seamlessly...
Introduction
One of the most essential and helpful tools a blockchain developer has as an arsenal is making contract calls. When working on complex and multi-contract projects it is very likely, that you won't be deploying a single smart contract file for the whole production. You might even deploy some contracts earlier than others.
Making contract calls is a flexible way for deployed contracts to interact with other deployed contracts on the blockchain. This way rather than having a messy long line of code, you have a network of contracts interacting with each other on the blockchain.
Throughout this tutorial you will learn how to:
Install and Setup Hardhat
Create a dummy smart contract
Use hardhat to deploy to the Scroll sepolia Network
And make contract calls on your deployed contract using hardhat test scripts
Prerequisites
To get the best out of this tutorial, you should have a basic and foundational understanding of the following:
Scroll Sapolia testNet
Faucets
Hardhat, Don't worry, you will be installing hardhat alongside this tutorial
Node
nodeand Node Package Managernpm. This tutorial will make use of the node package manager. You should have the node package managernpmpre-installed. Follow the links for more information on installingnodeand node package managernpm.
Scroll Network
Scroll is an L2 security-focused scaling solution for Ethereum, using innovations in scaling design and zero-knowledge proofs to build a new layer on Ethereum. The Scroll network is more accessible, more responsive, and can support more users at once than Ethereum alone, and if you’ve ever used or developed an application on Ethereum, you’ll be right at home on Scroll.
Faucets
Faucets are simply test funds sent to your wallet only to interact with a testNet Blockchain. To make transactions on the Scroll Sapolia TestNet you need faucets in Sapolia.
Following this tutorial, you will need faucets to deploy and transact on the Scroll Sapolia testnet. Getting faucets is always as easy as taking these few baby steps:
Head over to the faucet site for the test fund you need. For example, a Scroll Sapolia faucet will give you interaction with the testnet.
Copy your wallet address from metamask or your preferred wallet paste it into the tab and click on
Requestto get your faucets.
HardHat
Hardhat is an Ethereum Development Environment that runs on ether-js and solc-js and other basic EVM-compatible libraries. It is used for compiling, running, and deploying solidity smart contracts
Calling Onchain Contracts
Making a contract call simply means calling the functions from a deployed contract into another deployed contract on the blockchain. The calls can be made to retrieve data from a query function to a payable function for making payment, or even a modifier function for modifying a variable state
Now that you've been reminded of the tools we'll be needing, it's time to get your hands dirty with writing code to understand the purpose of this tutorial.
Installing and Setting up Hardhat
To get started with the coding part of this tutorial, you need to install Hardhat. In the next couple of steps, you will learn how to install Hardhat into your local work environment using yarn on you're preferred Package Manager
Create a workspace in you're preferred code editor.
Next, run the comm and
npx hardhat initto fire up your hardhat development environment. You will be prompted to choose the language you'll be working with.Click enter twice to enable the option
Create a Javascript Project. and to verify the project location. You will notice a new folder structure on your code editor file explorer.Run the command
npm install --save-dev hardhat @nomiclabs/hardhat-ethers@npm:hardhat-deploy-ethers etheron your terminal to install all the required dependencies you'll need for this tutorial
Now that you have successfully installed and set up your hardhat development environment. you will create the exemplary contracts you need to test the contract calls
Creating Your Smart Contracts
To simulate a contract call, you will need to create two smart contracts. These two contracts will be deployed on the Scroll Sapolia testnet. One of the contracts will have the calling functions TestContract.sol, while the other contract Person.sol will have the functions you will be calling from the previous contract TestContract.sol.
The Calling Contract Person:
Navigate to the contract folder in your workspace and rename the existing contract from Lock.sol to Person.sol.
To initialize the contract and the needed variables, copy and paste the code below:
// SPDX-License-Identifier: MIT
pragma solidity ^0.8.9;

contract Person {

// Initializing the variables to Null or None
    string name;
    uint256 age;
    bool has_payed;

}
Inside the Person.sol contract you will create the following simple functions:
- The first function will be an external function
getDetailsthat modifies the public variablesname, andage. The function will accept a person's details as inputs and assign them to the public variables. Add thegetDetailsfunction below to thePerson.solcontract created earlier.
    function getDetails(string memory _name, uint256 _age) external {
        name = _name;
        age = _age;
    }
- The second function
sayDetailswill also be an external view function that simply returns the most recent person's details stored in thegetDetailsfunction.
Copy and add the code below to the Person.sol Contract is the next function.
  function sayDetails() external view returns (string memory, uint256) {
       return (name, age);
   }
- The third function
payFeewill be an external payable function that transfers money into the contract to simulate a person making a payment, the function assigns the bool variableis_payedtotrueand the variable paid amountamounttomsg.value.
Copy and add the function below to the Person.sol contract.
    function payFee() external payable {
        value = msg.value;
        has_payed = true;
    }
- The last function is an external view function that returns multiple variables
value,contract_balance,has_payedbased on the payment functionpayFeebeing called earlier.
    function getValue() external view returns(uint256, uint256, bool) {
        return (value, address(this).balance, has_payed);
    }
The four functions created are sample functions to copy a real scenario of calling different types of functions from a contract.
Note: Alternatively, When creating contract calls you can also use the keywordInterface to initialize the calling contract. To know more about the interface Keyword and other Basic Solidity Data Types click here.
For Uniformity, purposes copy and paste the entire code below into the Person.sol contract file.
// SPDX-License-Identifier: MIT
pragma solidity ^0.8.10;

contract Person {
    string name;
    uint256 age;
    bool has_payed;
    uint256 value;

    function sayDetails() external view returns (string memory, uint256) {
        return (name, age);
    }

    function getDetails(string memory _name, uint256 _age) external {
        name = _name;
        age = _age;
    }

    function payFee() external payable {
        value = msg.value;
        has_payed = true;
    }

    function getValue() external view returns(uint256, uint256, bool) {
        return (value, address(this).balance, has_payed);
    }

}
The Caller Contract TestContract:
The second contract TestContract.sol will be the testing contract that will make the contract calls to the Person.sol contract. The contract will also have four different functions to call the four different functions from the first contract Person.sol.
When you want to call contracts from other contracts, one of the inputs has to be the address of the contract you are calling to. and following the format below:
    function <function_name> <(functoin_inputs)> <visibility> <mutability> returns(output_datatype) {
        do something
        return something
}
Note: *Do not copy the function above, it is just a layout on how to structure a calling function.
To initialize the TestContract.sol contract copy the code below:
// SPDX-License-Identifier: MIT
pragma solidity ^0.8.10;

import './Person.sol';

contract TestContract {

}
Note: You'll need to import thePerson.sol contract to refer to the functions in the Person.sol contract you'll be calling.
- The first function
callGetDetailsaccepts the address of the deployedPerson.solcontract as_testand the other arguments_name,_ageto pass to thegetDetailsfunction in thePerson.solcontract.
Copy and add the function below to the contract:
    function callGetDetails(address _test, string memory _name, uint256 _age) external {
        Person(_test).getDetails(_name, _age);
    }
- The second function
callSayDetailswill be an external view function that takes the deployedPerson.solcontract address as_test. And returns thename&agevariables in theSayDetailsfunction from thePerson.solcontract.
Copy and add the function below to the contract:
    function callSayDetails(address _test) external view returns (string memory, uint256) {
        return Person(_test).sayDetails();
    }
- The third function
callpayFeewill call thepayFeefunction in thePerson.solcontract. The function is a payable function for sending ETH into the smart contract.
    function callpayFee(address _test) external payable {
        paying(_test).payFee();
    }
The last function callgetValuewill be called the getValue from the previous contract Person.sol. The function will simply return the same values that the getValue function returns.
    function callgetValue(address _test) external view returns(uint256, uint256, bool) {
        return paying(_test).getValue();
    }
Copy and add the code below:
    function callgetValue(address _test) external view returns(uint256, uint256, bool) {
        return paying(_test).getValue();
    }
After adding all the functions created above, your complete TestContract.sol contract should look exactly like the code below.
// SPDX-License-Identifier: MIT
pragma solidity ^0.8.10;

import './Person.sol';

contract TestContract{
    function callGetDetails(address _test, string memory _name, uint256 _age) external {
        Person(_test).getDetails(_name, _age);
    }

    function callSayDetails(address _test) external view returns (string memory, uint256) {
        return Person(_test).sayDetails();
    }

    function callpayFee(address _test) external payable {
        Person(_test).payFee();
    }

    function callgetValue(address _test) external view returns(uint256, uint256, bool) {
        return Person(_test).getValue();
    }
}
Next, you'll be deploying the contracts you've created to the Scroll Sapolia testnet.
Deploying to Scroll Testnet
Hopefully, you should be familiar with deploying a contract on the Scroll Sapolia testnet. If not, here is a quick guide on how to deploy to the Scroll Sapolia testnet. In the next few steps, you will deploy both of the previously created contracts to the Scroll Sapolia testnet, to begin making the contract calls.
To Compile the Contracts run the command
npm hardhat compileon your terminal.
Head over to the deploy folder and replace the
Lock.jsdeploy script there with another two deploy scripts. Rename the files withdeploy_TestContract.jsanddeploy_PersonContract.js.Copy and paste the code below into the
deploy_PersonContract.jsfile:
const hre = require("hardhat");

const main = async () => {
  const PersonContract = await hre.ethers.getContractFactory("Person");
  const Person = await PersonContract.deploy();

  await Person.waitForDeployment();

  console.log("The Person contract was deployed to: ", Person.target);
};

const runMain = async () => {
  try {
    await main();
    process.exit(0);
  } catch (error) {
    console.error(error);
    process.exit(1);
  }
};

runMain();
- Copy and Paste the code below into the
deploy_TestContract.jsfile:
const hre = require("hardhat");

const main = async () => {
  const TestContract = await hre.ethers.getContractFactory("TestContract");
  const TestingContractCalls = await TestContract.deploy();

  await TestingContractCalls.waitForDeployment();

  console.log(
    "The TestContractCall contract was deployed to: ",
    TestingContractCalls.target
  );
}

const runMain = async () => {
  try {
    await main();
    process.exit(0);
  } catch (error) {
    console.error(error);
    process.exit(1);
  }
}

runMain();
Next, head over to the
hardhat.config.jsfile in the root folder and replace the hardhat config. code there with the configuration code below```javascript require("@nomicfoundation/hardhat-toolbox"); require("dotenv").config({ path: ".env" }); require("hardhat-deploy");
module.exports = { solidity: { version: "0.8.17", settings: { optimizer: { enabled: true, runs: 200, }, evmVersion: "london" } }, networks: { scrollTestnet: { url: "https://sepolia-rpc.scroll.io/" || "", accounts: process.env.PRIVATE_KEY !== undefined ? [process.env.PRIVATE_KEY] : [], }, }, }; ```
Replace the solidity version specified at the bottom of the
hardhat.config.jsfile with the same version of solidity specified in your contracts.Run the command
npm i dotenvto download thedotenvdependency, and create a new file in the root folder.env.Create a variable name
PRIVATE_KEYinside the dotenv file and add your intended Private wallet address as the value.Note: Make sure to verify that the
.envfile is added to your.gitignorefile if you'll be pushing to any version control.
- Run the command
npx hardhat run --network scrollTestnet scripts/deploy_PersonContract.jsto deploy thePerson.solcontract.

Note: Make sure to copy the contract address printed on the console, You'll need it while making the contract calls.
- Run the command
npx hardhat run --network scrollTestnet scripts/deploy_TestContract.jsto deploy theTestContract.solcontract.

Note: Make sure to copy the contract address printed on the console, You'll need it to make the contract calls.
And Voila, Contracts Deployed...🥂📝
Making On-Chain Contract Calls
Now it's time to make those contract calls. You'll be making use of the built-in hardhat tool Hardhat Console to interact with the contracts on the blockchain and make the contract calls.
- Run the command
npx hardhat console --network scrollTestnetto activate the hardhat console. You'll notice a prompt arrow appears>.
Note:
- Firstly, you'll have to test the functions in the
Person.solcontract by calling the function.
- To begin, Run the code
const Person = await ethers.getContractFactory("Person"), to simply get the deployed contract factory.
A successful transaction should look like the image below:
- Next, run the command
const person = await Person.attach("<Person.sol_contract_address>"), to gain access to the contract on the blockchain.
Now, to call the functions in the Person.sol contract:
Run the command
await person.sayDetails(), returns empty variablesnameandage. A successful transaction should look like the image below: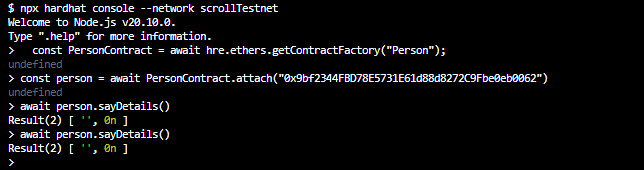
Run the command
await person.getDetails("Albert", 22). A successful transaction should look like the image below: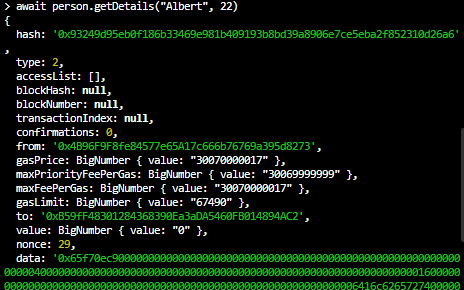
Rerun the first command await person.sayDetails(), this should return the name and the values input you sent in previously. Albert and 22: A successful transaction should look like the image below:

Run the command
await person.payFee(). A successful transaction should look like the image below: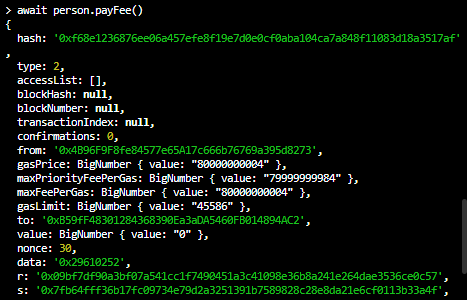
Run the command
await person.getValue().
A successful transaction should look like the image below:

Now that you know what the functions in the
Person.solcontract does, Now it's time to try calling the same function from another deployed contractTestContract.sol.
To begin, Run the code
const TestContract = await ethers.getContractFactory("TestContract"), to simply get the deployed contract factory.Next, run the command
const test = await TestContract.attach("<TestContract.sol_contract_address>"), to gain access to the contract on the blockchain.
Note: This is where you'll need the contract address of thePerson.sol You will need to pass the address as the first argument to all the function calls
assuming the deployedPerson.sol contract address is: 0x9bf2344FBD78E5731E61d88d8272C9Fbe0eb0062
Run the command
await test.callGetDetails("0xA019Ad7Ed1F3fc0276E0854F2fF022EFeFf5C8e1", "Julia", 25)A successful transaction should look like the image below
Run the command
await test.callSayDetails("0x9bf2344FBD78E5731E61d88d8272C9Fbe0eb0062")A successful transaction should look like the image below:
Run the command
await test.callpayFee("0xA019Ad7Ed1F3fc0276E0854F2fF022EFeFf5C8e1")A successful transaction should look like the image below:
Run the command
await test.callgetValue("0x9bf2344FBD78E5731E61d88d8272C9Fbe0eb0062")A successful transaction should look like the image below:
Conclusion
Finálè, you completed and learned quite a lot of new things here, You created two smart contracts, one will call functions and the other to make contract calls across the blockchain, You deployed both contracts to the Scroll Sapolia testnet successfully. You also interacted with the deployed contract using the Hardhat Console and you made several contract calls on the Sroll testnet.
If you find this article helpful, like and follow for more technical blog posts.
I'd love to connect with you on Twitter | LinkedIn | GitHub | Portfolio


