

Deploying a Smart Contract Using EthersJs and Ganache
Have you ever created a deploy script from scratch to deploy your smart contract on a local Blockchain using basic web3 tools like Ethers and solc?

Hi I'm Phenzic I simply wanna help you transition into web3 seamlessly...
Introduction
As an aspiring blockchain developer in the web3 ecosystem, you likely come across new innovative, and cutting-edge technologies revolving around smart contracts, and blockchains.
In this tutorial you will create a dummy smart contract, you will compile the contract using the Javascript solc-js compiler, and deploy the contract manually using a popular web3 framework ethers. js.
Most importantly you will learn how to create a deploy script manually and deploy your contract to a private blockchain network (Ganache).
Prerequisites
Throughout this tutorial, You will need the following requirements:
- You should have a package manager
yarnornpminstalled or updated along withnode. You can run the commandsyarn -vornpm -vandnode -vto verify your current installed versions. This tutorial will use theyarnpackage manager but you can also follow along usingnpm.
Just to recap, below are the definitions of the basic tools you will make use of during this tutorial:
What is EthersJs
Ethers.js is a javascript library that lets developers directly interact with the Ethereum blockchain and its Ecosystem. It is also the same library that runs underneath the Hardhat Development Environment. Ethers.js is one of the 2 most popular libraries that is used for interacting with the EVM and can be used across multiple languages like Python, typescript, java, javascript, Yacc, etc.
What Is Ganache
Ganache. is simply a private (personally) blockchain. It is a development tool that enables you to simulate a running blockchain environment locally. It is also a high-end development tool that acts as a safe zone for developing, deploying, and testing smart contracts for decentralized applications.
Ganache is a tool that was created as part of the Truffle Suite Ecosystem.
Install and Run the Ganache Blockchain
Now that you understand the basic concept of what Ganache is, In the next few steps, you will download and install the Ganache application interface. This will help you while starting with Ganache for the first time, to navigate the environment and controls effectively. Head over to the link to head over to the Truffle Suite website.
Click on the button labeled "Download" in the image below to download the application Interface.
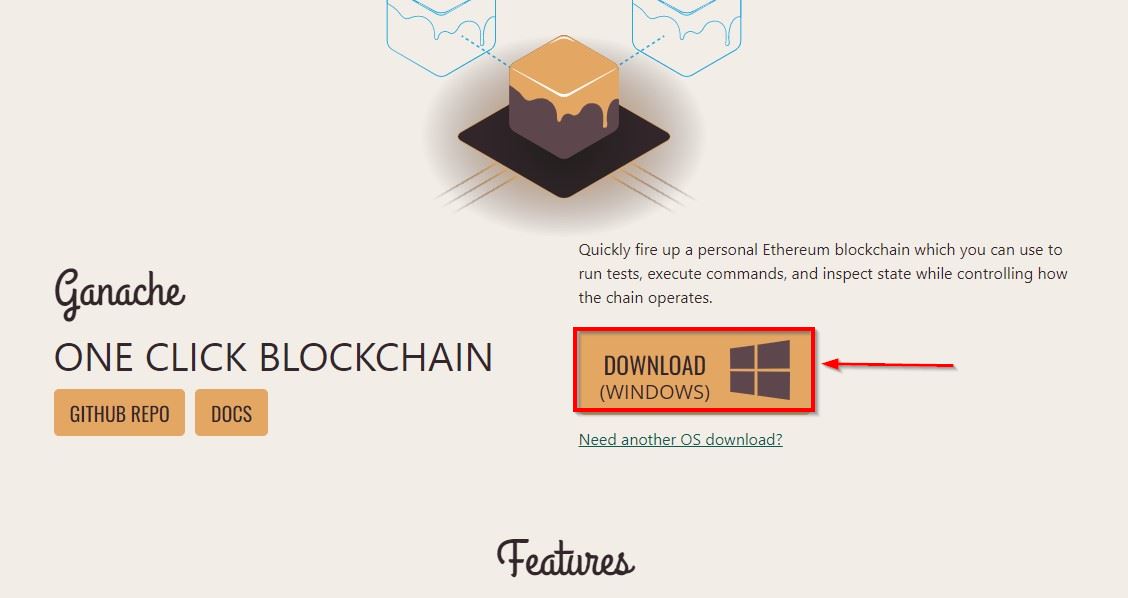
Note: It will automatically download the latest and best compatible version for your device - Windows or macOS.
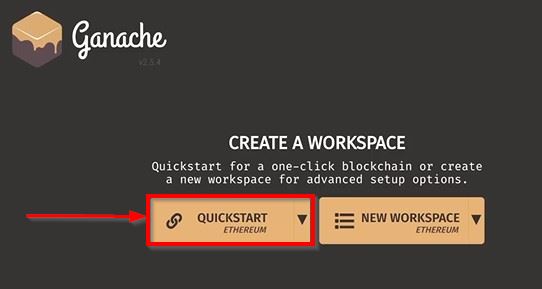
Now, Open the Ganache app, and it will look similar to the image below. Click on the button labeled "Quick Start" to start running your virtual blockchain locally. You can always test and deploy real-world contracts here as a safe Zone for testing your contracts.
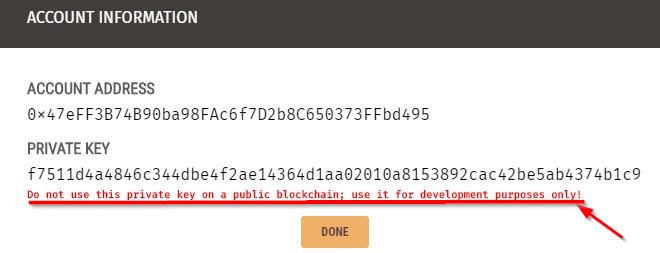
After spinning up your local blockchain, you will notice a list of 10 wallet addresses for different fake accounts, and they are only valid within your local blockchain. Each of these wallets has 100 ETH and their private key is attached
Note: When you click the Key Icon on the right side of any of the wallet addresses, You will find the account details, and also a warning you should consider crucial: "Do not use this private key on a public blockchain, use it for development purposes only"
Setting up the Environment
Here is a quick guide to installing node and your preferred package manager, npm or yarn into your global environment
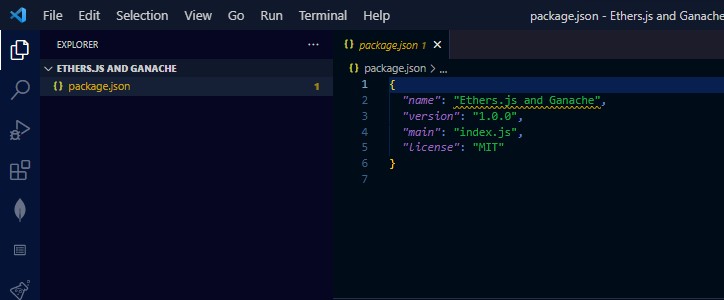
Having node and yarn package manager installed, run the command yarn init -y on your project folder terminal to initialize the package manager, or run npm init -y. The terminal will return a message similar to the image below.

You will also notice the package.json file appears on your workspace.
Now that you've initialized your preferred package manager, you can get started with installing all other dependencies you'll need along with this tutorial. In the next section, you'll be creating a simple smart contract for this project
Creating the Smart Contract
Now that you have the basic setup ready, create another file on the project folder and name the file PeopleProfile.sol.This is where you will have your smart contract written in solidity.
The PeopleProfile.sol file will be a simple contract that keeps a record of different profile details of individuals (names and ages).
After initializing the contract name, and adding a pragma solidity version, the contract will have a struct to initialize an object with a persons name and age
// The version of solidity we are compiling on >= 0.8.8
pragma solidity ^0.8.0;

// Initializing the contract
contract PeopleProfile {
   uint256 age;

    struct People {
        uint256 age;
        string name;
    }
Next, create an array to keep track of the number of different profile details added to the list of profiles and a mapping function nameToAgeto map a person's name to the age.
    Person[] public people;

    mapping(string => uint256) public nameToAge;
Now, Create a store function store to store a new age, a retrieve function retrieve that returns the age and an addPerson function. The addperson function will take a new person's name and age as input and add the details to the people array in the form of the Person struct created earlier.
And finally, the addPerson function will map the input name and age in the array.
  function store(uint256 _age) public {
        age = _age;
    }

    function retrieve() public view returns (uint256) {
        return age;
    }

    function addPerson(string memory _name, uint256 _age) public {
        person.push(Person(_age, _name));
        nameToAge[_name] = _age;
    }
Finally, your complete contract should look like the code below, For uniformity, you can copy and paste the code below into your PeopleProfile.sol contract :
pragma solidity ^0.8.8;

// Initializing the contract
contract PeopleProfile {
    uint256 age;

    struct Person {
        uint256 age;
        string name;
    }

    People[] public people;

    mapping(string => uint256) public nameToAge;

    function store(uint256 _age) public {
        age = _age;
    }

    function retrieve() public view returns (uint256) {
        return age;
    }

    function addPerson(string memory _name, uint256 _age) public {
        person.push(Person(_age, _name));
        nameToAge[_name] = _age;
    }
}
Now that you have created your simple contract. Next, you'll compile your contract using the JavaScript library solc-js for compiling your solidity codes.
Compiling the Smart Contract
For compiling your smart contract you will make use of the JavaScript solc-js library. solc-js is a node library and a command line tool that uses only JavaScript to convert solidity smart contracts into Ethereum Virtual Machine (EVM) executable bytecodes. To install the solc-js smart contract compiler, you can run yarn add solc. It is also very important to consider installing the version solc-js that is the same or higher than the contract's solidity version to prevent compiling with errors. To do this, run the command yarn add solc@0.8.0-fixed on your terminal. Use the same or a greater version of the solidity contract version.
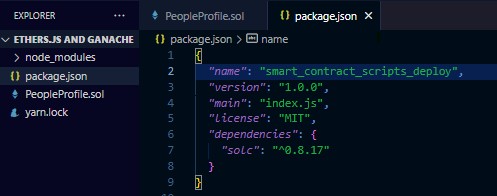
If you have installed solc-js you will notice it has been added you the list of dependencies in the package.json file.
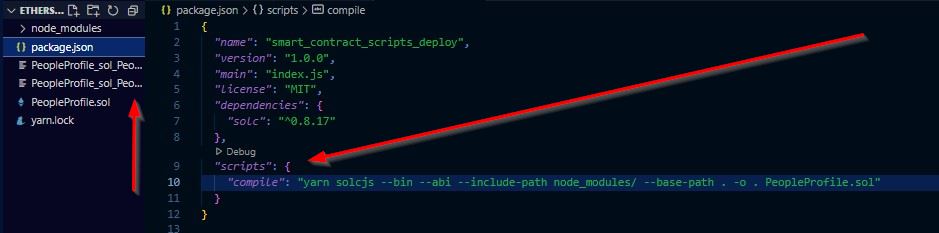
There are 2 ways to compile your contract using solc-js. 1. You can also compile your contract manually from your code terminal using the command : yarn solcjs --bin --abi --include-path node_modules/ --base-path . -o . PeopleProfile.sol. 2. Or you can create an scripts object in the package.json file, and add the same command. This way the contract will compile every time you run the command yarn compile on the terminal.
  "scripts": {
    "compile": "yarn solcjs --bin --abi --include-path node_modules/ --base-path . -o . PeopleProfile.sol"
  }
Your package.json file should like the image below:
After compiling the contract solc will automatically degenerate the compiled code into two new files the binary PeopleProfile_sol_PeopleProfile.bin and application binary life PeopleProfile_sol_PeopleProfile.abi
Creating the Deploy Script
To deploy your contract, you'll need a deploy script. When working with other big projects using other (something) like Harddhat, Remix, etc that automatically comes with a compiling script deploy.js or a compiling and deploying button. It is quite essential to know how the deploy script works and how to create a deploy script from scratch.
In the next few steps, you will create your deploy script from scratch using ethers.js to compile your solidity code. This will help you understand the need for the different functions in the deploy script.
Deploying the Smart Contract
Now it's time to get started on the deploy.js script that you will use to deploy your contract into the local Ganache Blockchain. You will need ethers.js to the deploy script. To install ethers.js run the command yarn add ethers or npm i ethers. You will notice the package has been added to the list of dependencies in the package.json file.\
Head over to your deploy script and import
ethers.js, create the main function, and call the function with a catch error function below the script. The main function will be asynchronous since interacting with the blockchain will return a promise.Copy and paste the code below:
  const ethers = require("ethers");

  async function main() {

  }

  main()
  .then(() => process.exit(0))
  .catch((error) =>{
  console.error(error);
  process.exit(1);
  })
To interact with the Ganache blockchain running locally. Head over to the Ganache interface, copy the Remote procedure call (RPC) server address
http://127.0.0.1:7545, and add the following variables. Grab the private key of any of the wallet addresses you want to use962c70c1be9dba5290407156c4d5045423aa7c10d8d4f9435b2e81067c76bfa9
Note: For the sake of this tutorial using your private key out in the open (on the deploy script) is allowed But you should never consider using your private key out in an open script like in the deploy script above. There a security best practices to always consider when working with mainnets.
```Javascript
async function main() { const provider = new ethers.providers.JsonRpcProvider( "http://127.0.0.1:7545" );
const wallet = new ethers.Wallet( "962c70c1be9dba5290407156c4d5045423aa7c10d8d4f9435b2e81067c76bfa9", provider ); } ```
The provider variable will connect your script to the blockchain. The wallet variable connects your wallet to the script. It enables the approval of all transactions.
Next, you will need to import the contracts
abi, and the binary file created after compiling earlier. To do this you'll need to install thefs-extrapackage using the commandyarn add fs-extra.Copy the code below to import your contract's
abicode into the deploy script.const ethers = require("ethers"); const fs = require("fs-extra"); async function main() { const provider = new ethers.providers.JsonRpcProvider( "http://127.0.0.1:7545" ); const wallet = new ethers.Wallet( "962c70c1be9dba5290407156c4d5045423aa7c10d8d4f9435b2e81067c76bfa9", provider ); const abi = fs.readFileSync("./PeopleProfile_sol_PeopleProfile.abi", "utf8"); const binary = fs.readFileSync("./PeopleProfile_sol_PeopleProfile.bin", "utf8"); }The
abiandbinaryvariables added to the function will import and hold onto the contract's abi and binary file using the fs-extra package.Now add a
contractFactoryobject to the main function. This is the object that will hold the details to deploy the contract.
    const contractFactory = new ethers.ContractFactory(abi, binary, wallet);
    console.log("Contract is deploying...");
- Finally, before deploying the contract add the code:
    const contract = await contractFactory.deploy();
    console.log(contract);
    console.log("Contract deployed! 🥂🥂");
Your final deploy.js the script should look like the code below:
const ethers = require("ethers");
const fs = require("fs-extra");


async function main() {
    const provider = new ethers.providers.JsonRpcProvider(
      "http://127.0.0.1:7545"

    );

    const wallet = new ethers.Wallet(
      "962c70c1be9dba5290407156c4d5045423aa7c10d8d4f9435b2e81067c76bfa9",
      provider
    );

    const abi = fs.readFileSync("./PeopleProfile_sol_PeopleProfile.abi", "utf8");
    const binary = fs.readFileSync("./PeopleProfile_sol_PeopleProfile.bin", "utf8");

    const contractFactory = new ethers.ContractFactory(abi, binary, wallet);
    console.log("Contract is deploying...");

    const contract = await contractFactory.deploy();
    console.log(contract);
    console.log("Contract deployed! 🥂🥂");

}

main()
  .then(() => process.exit(0))
  .catch((error) => {
    console.error(error);
    process.exit(1);
  });
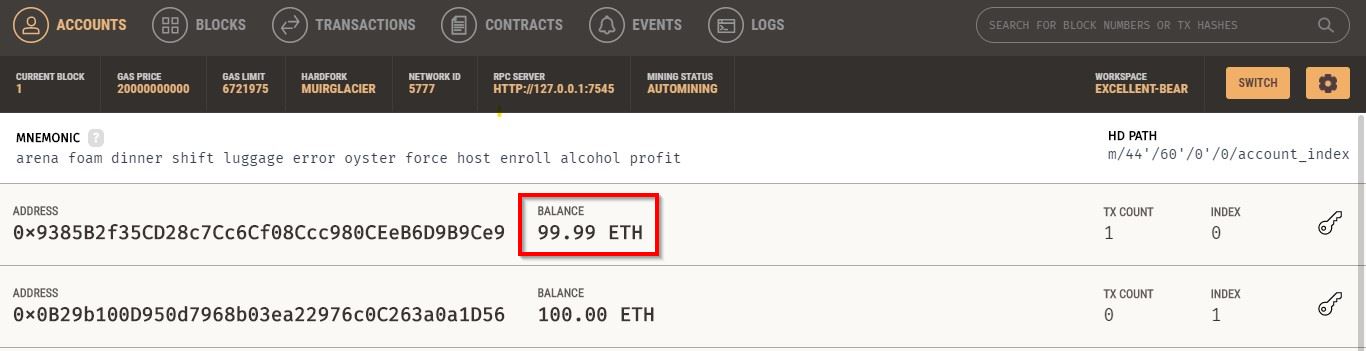
While the Ganache blockchain is still running locally, run the deploy.js script. Head back to the Ganache interface and you will notice a reduction in the amount of ETH in the wallet address you used to deploy the contract.
You can also find the details of your deploy contract in the Transaction tab on the Ganache Interface.
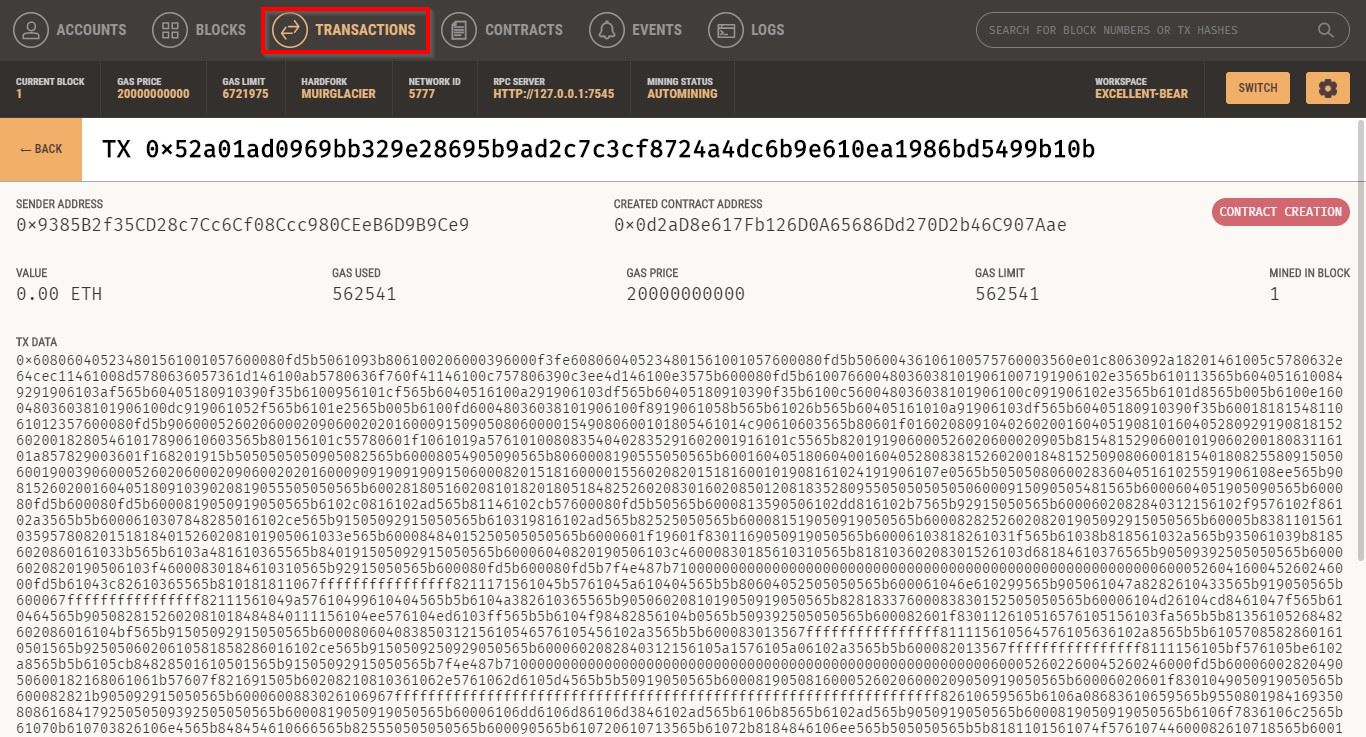
Voila, You've successfully deployed your contract.

Conclusion
By completing this tutorial, you have successfully deployed to a local blockchain using Truffle Ganache. You created a contract and built a deploy script from scratch. Now you understand the need for the functions and variables in the deploy script.
On moving on to other more complex web3 tools like hardhat, web3.js, etc. you'll find debugging and implementing these scripts quite easier.


